The Alert icon allows an Administrator of your account to create, manage and view Alerts for your account. Alerts are customized by you to fit the exact needs of your company to manage and track Assets you have deployed. Alerts notify you of your Asset’s activity based on the parameters you have defined in the TeMeDa system with Zones, Locations, Asset activity such as speed, location, battery, and many others.
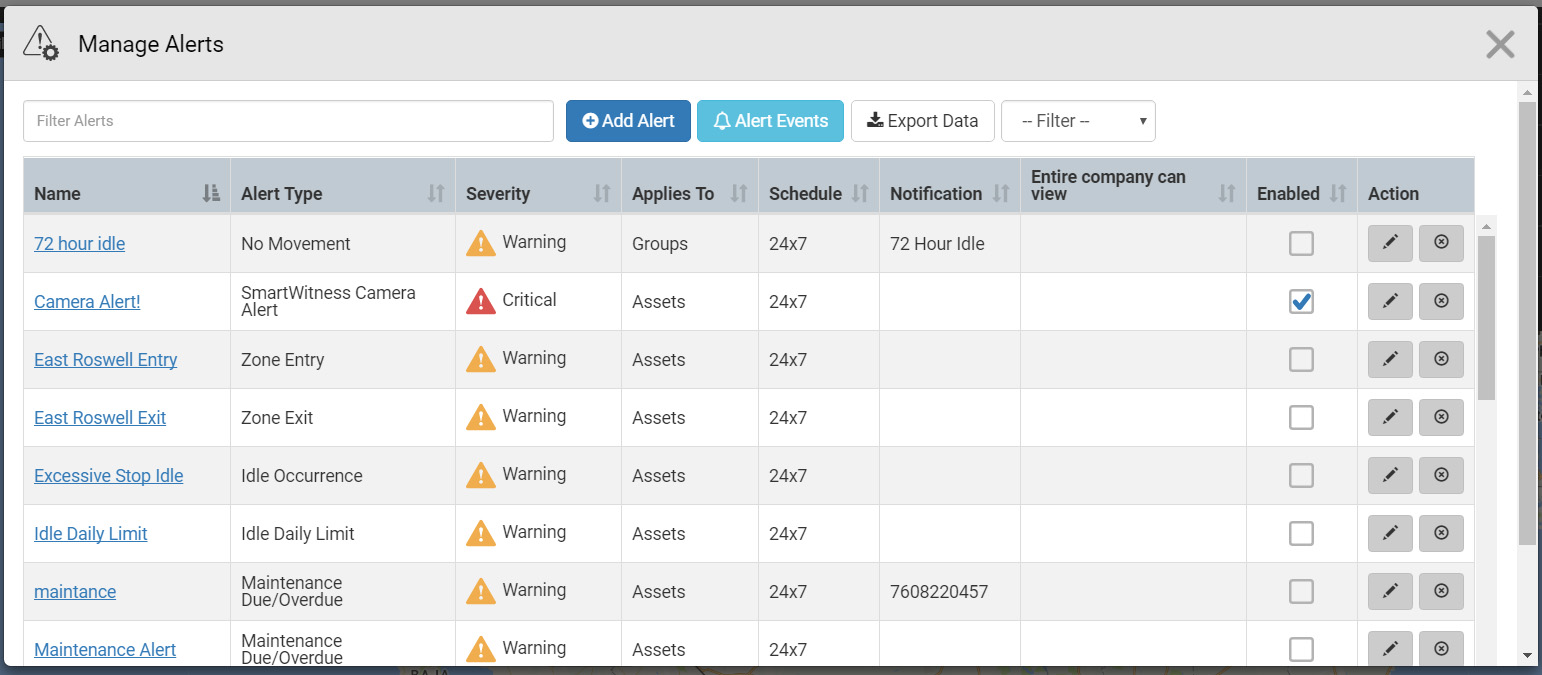
Manage Alerts will open a new window showing you all logistic information of your defined Alerts. From this page, you will be able to add a new Alert, enable and disable an existing Alert, edit an existing Alert, delete an Alert and export Alert information.
Adding an Alert
At the top of the Add Alert window, you can select whether or not the Alert is enabled as well as if the Alert is able to be viewed by the entire account. Only Administrators of your account can set an Alert to be able to be viewed by the entire account. Otherwise, the Alert will be only visible to the user who created the Alert definition.
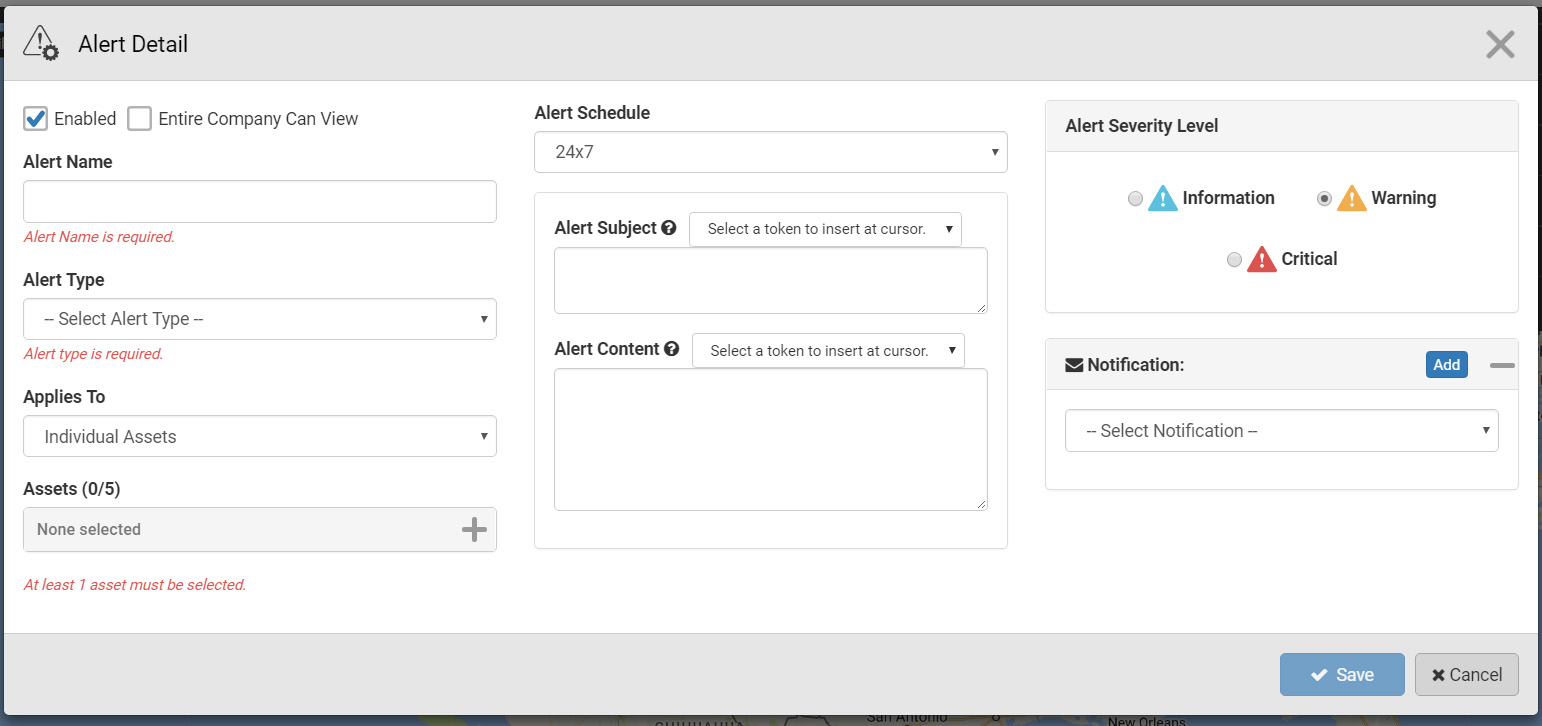
The required components of creating an Alert are an Alert Name, an Alert Type, and you need to assign at least one Asset, one Group, or the entire company to the Alert. Depending on which Alert Type you chose, the fields on the window will change. For example, if you select Speeding as the Type of Alert you will then have the options to enter in the max speed and how long an Asset needs to be traveling at that speed for the system to Alert you. Another example of an Alert Type is the Zone Exit Alert which notifies you when an Asset leaves a Zone.
The next step is to schedule the Alert. This sets the time periods as to when the Alert will or will not be active. You can choose to have it active 24×7 (all of the time) or you can choose the time periods as to when the alerts are active – either within a schedule or outside a schedule. Here are a couple examples:
24×7 – You can choose to have an Alert on an Asset so that anytime it leaves a Zone a Project Manager is notified of the dump truck being moved.
Custom (Inside a Schedule) – You can choose to have an Alert on an Asset only between the hours of 8AM and 5PM Monday thru Friday so you know that a dump truck doesn’t leave a certain Zone. During this period, if the dump truck does leave the Zone, an Alert can be sent to the Manager on-site that something happened to cause the dump truck to leave the site – get a refill on gas, taken off-site for maintenance, etc.
Custom (Outside a Schedule) – You can choose to have an Alert on an Asset OUTSIDE of the hours of 8AM and 5PM Monday thru Friday so that you know a dumptruck doesn’t leave a certain Zone. During this period, if the dump trunk does leave the Zone, an Alert can be sent to the Security Manager in charge of making sure the site is secure after hours. This could be because the dump truck is being towed, stolen, or any of a dozen other reasons.
The Alert Subject and Content will have predefined information based on the Alert Type. If you’d like to change this, you can modify the Alert information using a combination of Alert Tokens and standard text.
You can choose between Information, Warning and Critical for the Alert’s severity level.
The Notification box is designed so that you can send and receive alerts via emails or texts to any number of addresses or mobile numbers. If you’ve already created a Notification, you can select it from the drop down. If you need to add a new Notification, press the Add button on the top right of the Notifications box. When entering a new Notification, define the Notification’s Name, the email addresses(es) you’d like the Alert sent to with commas separating the addresses(es) and the mobile number(s) that you’d like the Alert sent to with commas separating the addresses.
When you’re finished adding the new Alert’s information, click the Save button on the bottom right of the window.
Editing an Alert
To edit an existing Alert, click on the pencil icon in the Alert’s row.
You have almost all of the same capabilities as creating a new Alert with the exception that you cannot change the Alert Type. Once you’ve made your edits, click the Save button in the bottom right corner.
Enable and Disable an Alert
You can toggle an Alert between an enabled and disabled state by clicking the ‘Enabled’ checkbox for the Alert you wish to change.
Deleting an Alert
To delete an Alert, click the “‘x’ with a circle around it’ icon for the Alert you wish to delete. Once you click on ‘Delete’ in the confirmation box, your Alert will be deleted.
Export Alerts
You can export Alerts as comma-separated values by clicking the Export Data button in the Alerts window.